So, you’ve bagged a deer—congratulations! But bringing the deer down was just half the job, and now you’ll have to get your hands dirty field dressing your kill. Now, you might be wondering why it’s important to field dress the animal immediately after you kill it. Deer retain a lot of heat inside them after they die, and this accelerates the growth of bacteria and gases that start breaking down the deer immediately after it dies. The longer they’re left inside, the more they propagate, leeching into the meat and tainting its flavor, in extreme cases even making it unsafe to eat.
In other words, field dressing is a necessary part of the hunting process, ensuring your venison stays fresh and free of contaminants. Don’t worry; with a sharp knife and a bit of patience, it’s easier than you think. Here’s a step-by-step guide to field dressing your deer:
Before you dive in, make sure you have the tools for the job:
- A sharp hunting knife (a dull blade is an enemy, not a friend).
- A pair of field dressing gloves or surgical gloves if you prefer to keep your hands clean-ish.
- A small bone saw or game shears for tough jobs like cutting through the pelvic bone (optional but handy).
- A game bag to keep flies, dirt, and debris off your meat.
Pro Tip: If it’s your first time, keep a buddy nearby. Even if they just provide moral support (or hold the legs).
- Make Sure the Deer is Dead
Causing unnecessary suffering to your prey is cruel, and any ethical hunter should take care to ensure the deer’s quick passing for the sake of both the animal and himself, since a dying deer might use the last of its energy to kick at the approaching hunter, which is why it’s always a good idea approach a downed deer from behind or at an angle.
Keeping your rifle, bow, or sidearm ready, look for signs of life. If you see any eye movement, breathing, or ear movement, deliver a shot to the brain or upper neck. A knife should only be used as a last resort if you can approach the deer safely.
- Position the Deer
Lay the deer on its back with its legs spread. This position gives you easy access to the underside. If the terrain is uneven, prop the body up with rocks or logs to keep it stable.

Pro Tip: Be mindful of gravity. Gut contents like to move downhill, and nobody wants a mess on their boots.
- Start with the Belly Incision
Locate the bottom of the jaw, the sternum (where the ribcage ends) and the anus (yep, we’re going there—it’s important). Your incision will connect these three points. Pinch the skin just below the sternum, then use your knife to make a shallow cut down to the anus. Keep the blade angled upward to avoid puncturing the stomach or intestines. Then turn your knife in the other direction and cut towards the jaw.

Pro Tip: Don’t go in blind! Many hunting knives have a gut hook to make this step foolproof. If yours doesn’t, use your fingers to guide the blade carefully.
- Free the Windpipe
Cut the windpipe in two as far up the neck as possible, then grab it and pull hard in a quick downward motion to free the intestines to the middle section. Now, the diaphragm is a thin sheet of muscle separating the chest cavity from the abdomen. Slice through it on both sides of the ribcage to access the heart and lungs.

If you’re planning to harvest the heart (and you should—it’s delicious), cut it free and set it aside in a clean bag.
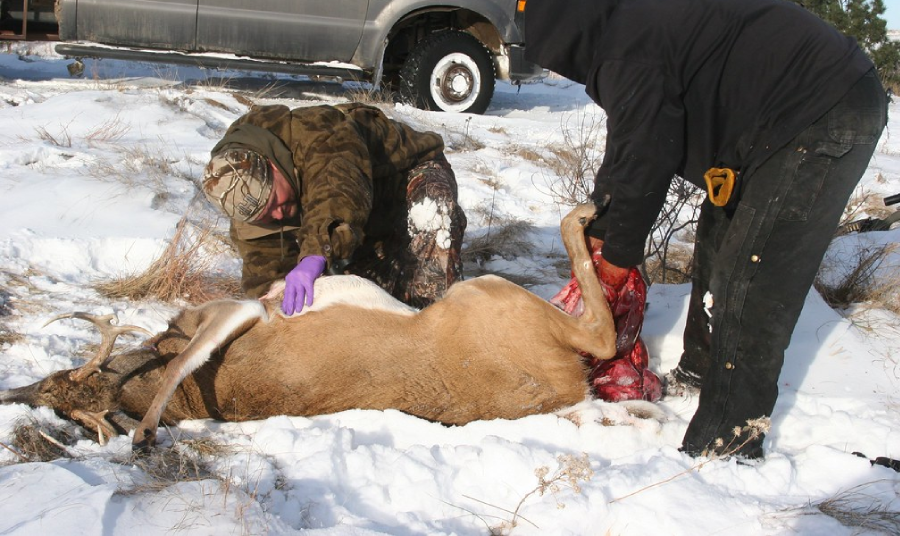
- Remove the Organs
Now comes the fun part—removing the guts. Move the rocks propping up the animal and turn the deer on its side, cutting through membranes holding the guts in place. Gently pull the esophagus and attached organs (heart, lungs, liver, stomach, and intestines) toward the rear of the animal. They should come out in one neat package.

Pro Tip: Slow and steady wins the race. If you tug too hard or slice carelessly, you risk puncturing the stomach or intestines, which can spoil the meat with bacteria. If this happens, rinse the area immediately.
- Extract the Anus
Using your knife, carefully cut around the anus to free it from the pelvic canal. A specialized tool like the "Butt Out" can make this job easier (but is completely optional). Once it’s freed, pull it through the pelvic cavity along with the remaining organs.

Pro Tip: Aim for precision over speed. Rushing this step can lead to an unfortunate mess.
- Optional: Split the Pelvic Bone
Some hunters find it easier to split the pelvic bone for better access to the lower cavity and to ensure all remaining organs are completely removed. While a small saw or game shears are the traditional tools for this task, there’s another method that doesn’t require extra gear: using your own body weight to split the bone.
Use your knife to make a shallow cut along the pelvic bone seam to weaken it, then place your boot securely on the pelvic bone, just to one side of the seam, shifting your weight steadily to create enough force to snap the bone. If it doesn’t break right away, reposition your foot on the other side of the seam and repeat the process until the bone is split.
While this step is not strictly necessary, it does make cleaning the animal much easier.
- Drain and Clean the Cavity
Tilt the deer to drain any remaining blood from the body cavity. Use a clean cloth or paper towels to wipe out any residue. If you’re in the field for an extended period, pack the cavity with ice to keep the meat cool.
Pro Tip: Avoid rinsing with water unless absolutely necessary—it can introduce bacteria.
- Tag Your Deer and Transport It
In many states, tagging your deer is a legal requirement before transport. Attach the tag securely, then load your deer into a game bag or tarp to keep it clean during transport.
- Pat Yourself on the Back
Field dressing is no small task, especially for beginners. Take a moment to appreciate your work before heading back to camp to celebrate with your hunting buddies.
Final Thoughts
Field dressing may seem intimidating, but it’s a skill every hunter needs to master. Take your time, stay calm, and remember: practice makes perfect. Plus, nothing beats the taste of fresh venison you processed yourself. Happy hunting—and may your knife stay sharp!
Images courtesy Texas Parks and Wildlife Department © 1963 & Hunter Specialties
Have a great outdoor adventure story? Share it with us! Accepted stories will receive a 20% discount code.

Frequently Asked Questions
Why is it important to field dress a deer immediately after killing it?
Field dressing is important to prevent the growth of bacteria and gases that can taint the meat and make it unsafe to eat.
What tools do you need for field dressing a deer?
You will need a sharp hunting knife, field dressing gloves, a small bone saw or game shears, and a game bag to keep the meat clean.
How can you ensure the deer is dead before field dressing?
Look for signs of life such as eye movement, breathing, or ear movement. If unsure, deliver a shot to the brain or upper neck.
What is the proper position to place the deer for field dressing?
Lay the deer on its back with its legs spread to have easy access to the underside.
Where should you start the belly incision when field dressing a deer?
Start the incision at the bottom of the jaw, the sternum, and the anus, connecting these three points to begin the process.
How can you free the windpipe during field dressing?
Cut the windpipe in two as far up the neck as possible, then pull it out to remove it from the deer's body.